Silt fences
Silt socks
Sediment Control
Super silt fences
What, why, when, and issues to look out for
What
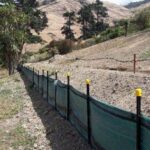
A super silt fence is a temporary barrier of woven geotextile fabric over a chain link fence that captures mainly coarse sediments carried in sheet flow. Super silt fences temporarily impound sediment-laden runoff, slowing down the flow rate and allowing sediment to settle out of the water.
Why
Like silt fences, super silt fences detain runoff flows so that transported sediment can be deposited by settlement. However, because of the chain link fence within them, they are stronger and can be used in different situations
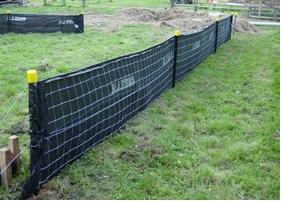
Super silt fence.
When
Super silt fences are mainly used in the following situations:
- To control runoff from steeper or larger catchments than silt fences can handle
- To intercept sheet flow
- To mark out the boundary limits of disturbance on earthworks sites, such as riparian areas or bush reserves
- To provide a barrier that can collect and hold debris and soil, preventing the material from entering critical areas, watercourses or streets
- When installing an earth or topsoil bund would destroy sensitive areas such as bush and wetlands.
Place super silt fences as close to the contour as possible. No section of the fence should go over a grade of 5% for a distance of more than 15 m.
Issues to look out for
Super silt fences have the following limitations:
- Super silt fences do not capture many soil particles finer than 0.02 mm in diameter (for example fine silts and clays, including loess). This is because of the short time that water is detained behind the fence and the relatively large pore size of most fabrics.
- The pores in the super silt fence fabric become clogged relatively quickly with fine textured sediments, so the fabric becomes impermeable.
- Don’t install silt fences across watercourses, in areas of concentrated flows or try to use them as check dams in channels. Only use super silt fences for sheet flows.
- Because installing super silt fences requires excavation and soil disturbance, carefully consider whether this is the right tool for the situation. Excavating close to waterway margins can affect water quality, so consider other tools – eg compost bunds – that may have less risk.
- Use super silt fences along with other tools from this toolbox as part of a treatment train, mix and match approach.
Design essentials
The following points are design essentials:
- Make sure that the super silt fence height is 800 mm above ground level.
- Maximum slope lengths, spacing of returns and maximum silt fence lengths are shown in Super silt fence design criteria table.
- Always install super silt fences along the contour (at a break in slope). Where this is not possible, or where there are long sections of super silt fence, install short silt fence returns projecting upslope from the silt fence to minimise the concentration of flows. Silt fence returns should be a minimum 2 m in length, and can incorporate a tie back. They are generally constructed by continuing the silt fence around the return and doubling back, eliminating joins.
- Join lengths of silt fence by doubling over fabric ends around a waratah or by stapling the fabric ends to a batten and butting the two battens together.
- Install silt fence returns at either end of the silt fence, projecting upslope to a sufficient height to prevent outflanking.
- When considering super silt fence installation for larger catchments (greater than 0.5 ha) as in Super silt fence design criteria table, carefully consider the specific site conditions and other alternative control measures available.
- Base the length of the super silt fence on the limits shown in Super silt fence design criteria table.
| Slope steepness | Slope length (m) (maximum) | Spacing of returns (m) | Super silt fence length (m) (maximum) |
|---|---|---|---|
| 0–10% | Unlimited | 60 | Unlimited |
| 10–20% | 60 | 50 | 450 |
| 20–33% | 30 | 40 | 300 |
| 33–50% | 30 | 30 | 150 |
| > 50% | 15 | 20 | 75 |
- Where the ends of the geotextile fabric come together, overlap, fold and staple the fabric ends to prevent sediment bypass
- The geotextile fabric must meet the following requirements:
- Grab tensile strength: >440N (ASTM D4632)
- Tensile modulus: 0.140 pa (minimum)
- Apparent opening size: 0.1–0.5 mm (ASTM D4751).
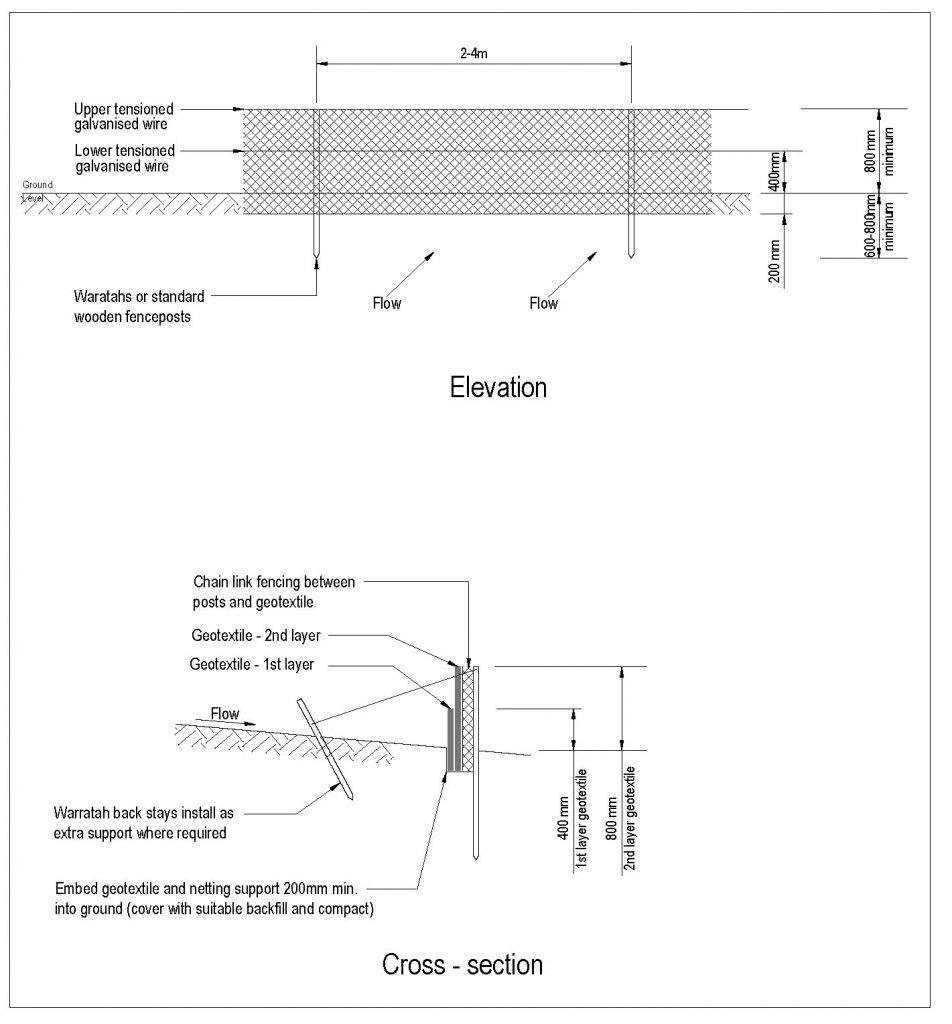
Schematic of a super silt fence.
Construction and operation
- Use super silt fence material appropriate to the site conditions and according to the manufacturer’s specifications.
- Always install super silt fences along the contour.
- Excavate a trench that is at least 100 mm wide and 200 mm deep along the proposed line of the super silt fence.
- Use supporting waratahs at least 1.8 m long.
- Make sure that the 1.8 m long waratahs are driven to an appropriate depth (0.8 m minimum).
- Install tensioned galvanised wire (2.5 mm HT) at 400 mm and again at 800 mm above ground. Tension the wire using permanent wire strainers attached to angled waratahs at the ends of the super silt fence.
- Secure chain link fence to the waratahs with wire ties or staples, ensuring the chain link fence goes to the base of the trench.
- Fasten the super silt fence material securely with ties spaced every 600 mm at the top and mid- section of the super silt fence (Note: Most manufacturers now supply specific super silt fence geotextile with the two layers of geotextile already joined).
- Place the super silt fence material into the base of the trench (a minimum of 200 mm into the ground) and place compacted backfill back to the original ground level.
- When two sections of super silt fence material adjoin each other, make sure that they are doubled over a minimum of 300 mm, wrapped around a waratah and fastened at 75 mm spacings, to make sure that sediment can’t get past.
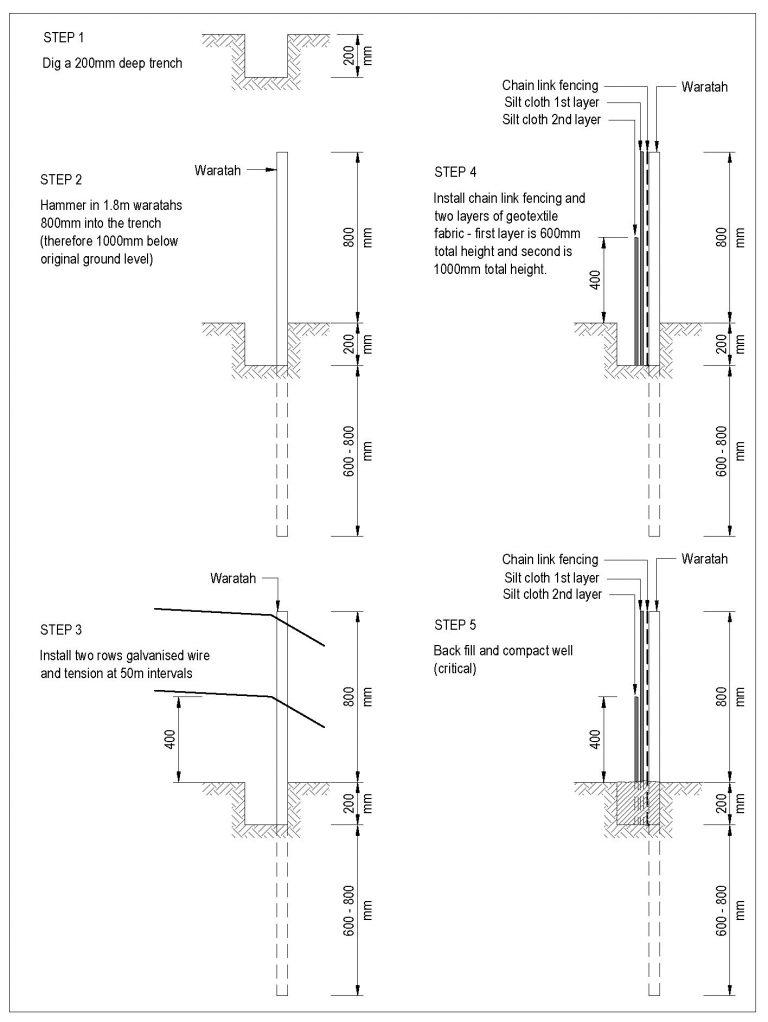
Step-by-step installation of a super silt fence.
Maintenance and decommissioning
When maintaining super silt fences
- Inspect super silt fences at least once a week and after each rainfall.
- Check for damage including rips, tears, bulges in the fabric, broken support wires, loose waratahs, overtopping, outflanking, undercutting, and leaking joins in the fabric.
- Make any necessary repairs as soon as you find them.
- When the geotextile material becomes clogged with sediments, ponding lasts longer. Clean the super silt fence geotextile carefully with a light broom or brush to maintain performance.
- Remove sediment when the fence bulges or when sediment accumulation reaches 20% of the fabric height. But also remove sediment deposits as necessary before either of these situations happens, to make sure that there will be adequate sediment storage and to reduce pressure on the fence.
- Dispose of sediment to a secure area to make sure that it doesn’t discharge to the receiving environment.
When decommissioning super silt fences
- Stabilise the catchment area
- Remove the silt fence and accumulated sediment
- Dispose of the accumulated sediment correctly
- Backfill the trench, then re-grade and stabilise the disturbed area.